The tool can be used in one of the two modes: quick data recovery and slower, more comprehensive recovery from missing or damaged partitions. Let’s have a look at what’s offered by each of the two modes.
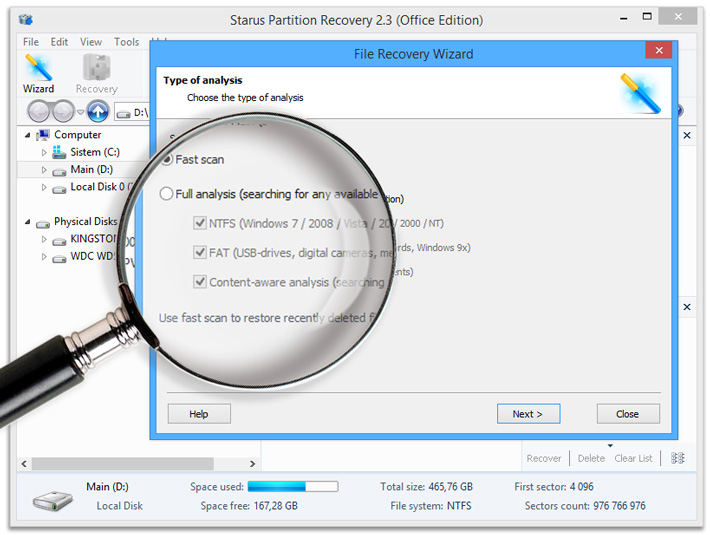
Instant Analysis
You read it right: the Quick mode works near instantly if you’re recovering information from an existing healthy partition. Obviously, the Quick mode is limited to recovering deleted files such as those removed from the Recycle Bin or erased with a third-party application.
To launch instant analysis, do the following:
- Select drive letter containing the deleted files you’re about to recover.
- On the next window, choose “Quick Scan”.
- Wait a few moments for the scanning process to complete. After the analysis is finished, you’ll see the discovered files and folders. You can click on a folder on the left side of the window to browse the files it contains. Select files and folders to recover and save them onto another hard drive or removable media.
The following options are available to help you locate files and folders to recover:
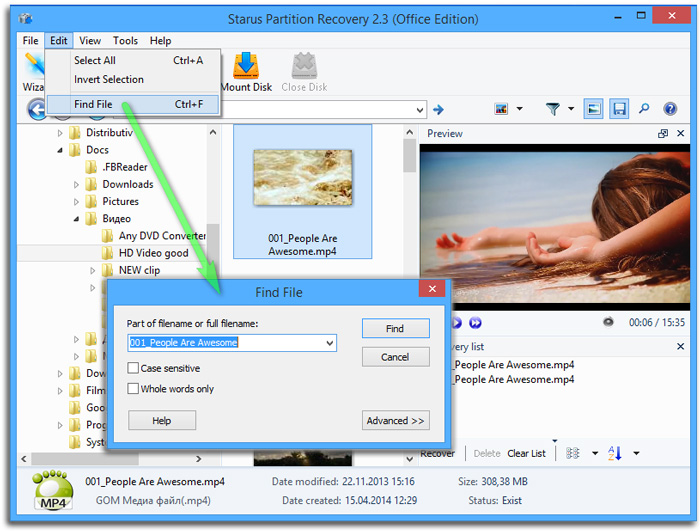
- “Search” helps you find a file by any part of its name, size, date and other parameters
- “Filter” helps you configure the active view to only display deleted files, existing files, or all files
- If “Pre-recovery preview” is active, you can view files by simply clicking on them
Recovering Data from Damaged Partitions
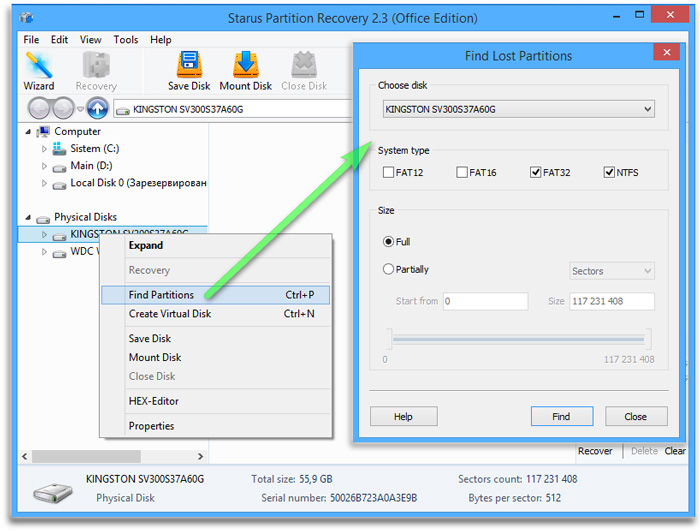
Now, if your partitions do NOT appear as drive letters, you will need to perform a slower recovery procedure. Start by making the tool scan the hard drive for deleted volumes.
In order to scan the hard drive for deleted volumes , select the appropriate hard drive in the left part of the main window, then use the “File” – “Find partitions” command. When prompted, specify the file system(s) that were used on the deleted partition(s). You can also specify whether to scan the entire disk surface or just a certain area. For example, if you are recovering a hard drive with a single system partition, you can significantly speed up the scan by only allowing the tool to look for partitions in the first 10% of the disk.
After the tool discovers partitions, they will be displayed in the Explorer tree. You’ll be able to use them as you would use an existing partition in Starus Partition Recovery.
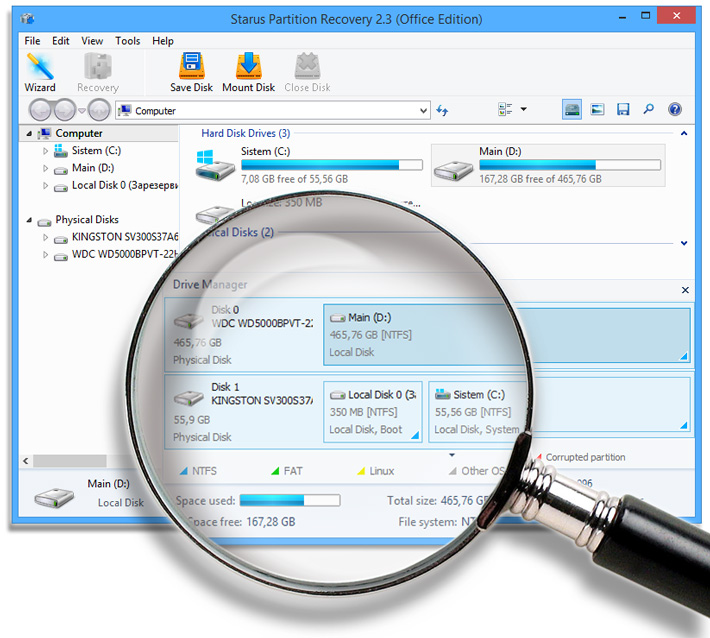
Comprehensive Analysis
When recovering information from damaged, formatted or deleted partitions, you’ll need to scan selected volumes for files and folders. Specify a volume to scan, and click Next. You’ll be prompted whether you’d like to perform a “Quick Search” or the “Full Analysis”. You would only use Quick Search if the volume appears as a drive letter and its file system is not damaged. Otherwise, choose Full Analysis.
In Full Analysis mode, the tool will scan the entire file system of the volume and discover all files that can still be recovered. The process may take a while; however, the wait is well worth it, as your files will be recovered completely along with their original folder structure.
Safe Recovery Using a Virtual Drive Image
For badly damaged and severely corrupted hard drives, we offer a special extra-safe recovery mode. In this mode, the tool will first make a raw snapshot of the original disk, saving its entire content into a file on another storage media. After that, you can remove the original (damaged) hard drive and continue the recovery safely by using the snapshot you’ve just made. Nothing you do to the snapshot will affect the original disk in any way.
Note that these snapshots can be used by any Starus tool, so you can create a snapshot in one application and use it in another one. In order to make a snapshot, select a logical disk volume or a physical device, then click “Save Disk” on the toolbar. When prompted, specify whether you’re saving the entire content of the device or just a certain area, select the location of the resulting image file and specify its name. Click “Save” to begin.
Deep Analysis
If the file system is severely damaged, or if a file you are about to recover was deleted a long time ago, the tool may be unable to obtain information about a file from the file system. However, the files themselves may still be recoverable. If this is the case, the tool will perform a deep scan of the disk surface, looking for available data by attempting to match information it reads from the disk against a database of supported file signatures. If a known signature is encountered, the tool will attempt to analyze the file’s header and determine its exact location on the disk based on this information. Any files recovered via deep analysis will be placed into a special folder named “$ Deep analysis” and located at the root of the disk. The files will be sorted by extension.
Saving the Data
While it may appear that saving files and folders you’re about to recover is as simple as clicking the “Save” button, there is a catch: you may NOT save anything onto the same disk or drive letter you are recovering the files from. Otherwise, you’ll be risking permanently damaging the very files you were about to recover.
In order to recover the entire volume or just a few files and folders, select a disk volume or select files/folders, and click “Recover”. You’ll be able to use one of the four methods:
- Save to hard drive
- Save to CD/DVD
- Make an ISO image
- FTP upload
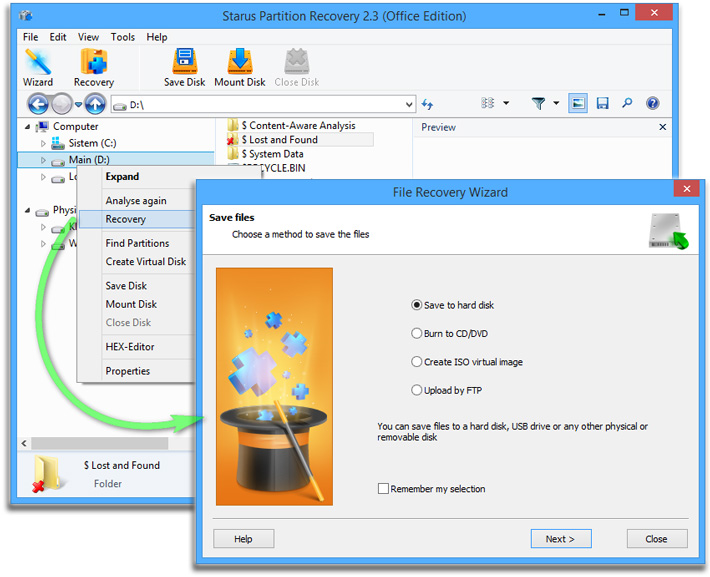
As mentioned earlier, you MUST use a different disk, partition or storage device to save files being recovered. If you write them onto the same volume you are recovering them from, you’ll be risking overwriting the original (deleted) data set and losing your data – this time forever.
Using Starus Partition Recovery is extremely easy – even if you’ve never used a data recovery tool before. An Explorer-like interface combined with a fully guided step-by-step wizard make the process easy and safe. If you are a pro, you’ll enjoy the following advanced options:
- HEX editor to allow viewing files, partitions or disk sectors.
- Disk manager to access partitions located on physical hard drives. All disk management functions are available.
- Custom file start allows manually specifying the beginning address of the file (the first disk sector that belongs to that file).
One last note: always try to perform the recovery as soon as possible.
The sooner you do it, the greater your chance of successful recovery.
